图片格式转换,以前小F可能第一时间想到的是【格式工厂】这个软件。
如今编写一个Python脚本就能完成各种图片格式的转换,此处以jpg转成png为例。
有两种解决方法,都分享给大家。
# 图片格式转换, Jpg转Png

# 方法①

from PIL import Image

img = Image.open('test.jpg')

img.save('test1.png')

# 方法②

from cv2 import imread, imwrite

image = imread("test.jpg", 1)

imwrite("test2.png", image)如果你有100个或更多的PDF文件需要加密,手动进行加密肯定是不可行的,极其浪费时间。
使用Python的pikepdf模块,即可对文件进行加密,写一个循环就能进行批量加密文档。
# PDF加密

import pikepdf

pdf = pikepdf.open("test.pdf")

pdf.save('encrypt.pdf', encryption=pikepdf.Encryption(owner="your_password", user="your_password", R=4))

pdf.close()
有加密那么便会有解密,代码如下。
# PDF解密

import pikepdf

pdf = pikepdf.open("encrypt.pdf",password='your_password')

pdf.save("decrypt.pdf")
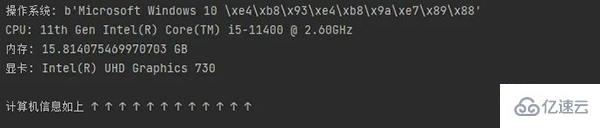
pdf.close()很多小伙伴可能会使用鲁大师来看自己的电脑配置,这样还需要下载一个软件。
使用Python的WMI模块,便可以轻松查看你的电脑信息。
# 获取计算机信息

import wmi

def System_spec():

Pc = wmi.WMI()

os_info = Pc.Win32_OperatingSystem()[0]

processor = Pc.Win32_Processor()[0]

Gpu = Pc.Win32_VideoController()[0]

os_name = os_info.Name.encode('utf-8').split(b'|')[0]

ram = float(os_info.TotalVisibleMemorySize) / 1048576

print(f'操作系统: {os_name}')

print(f'CPU: {processor.Name}')

print(f'内存: {ram} GB')


print(f'显卡: {Gpu.Name}')

print("n计算机信息如上 ↑ ↑ ↑ ↑ ↑ ↑ ↑ ↑ ↑ ↑ ↑ ↑")

System_spec()
就以小F自己的电脑为例,运行代码就能看到配置。
使用zipfile模块进行文件解压,同理也可以对文件进行压缩。
# 解压文件

from zipfile import ZipFile

unzip = ZipFile("file.zip", "r")

unzip.extractall("output Folder")帮助你将Excel工作表合并到一张表上,表内容如下图。
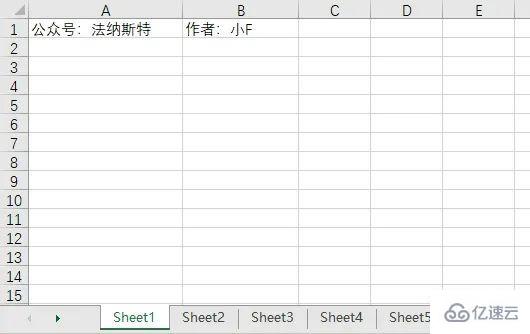
6张表,其余表的内容和第一张表都一样。
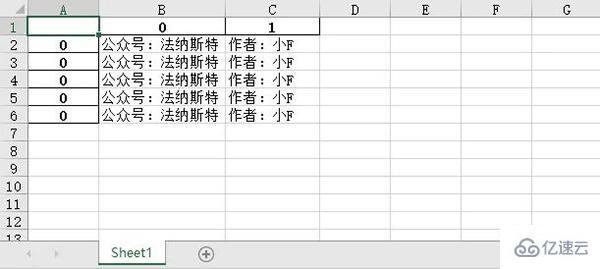
设置表格数量为5,将会合并前5张表的内容。
import pandas as pd

# 文件名

filename = "test.xlsx"

# 表格数量

T_sheets = 5

df = []

for i in range(1, T_sheets+1):

sheet_data = pd.read_excel(filename, sheet_name=i, header=None)

df.append(sheet_data)

# 合并表格

output = "merged.xlsx"

df = pd.concat(df)

df.to_excel(output)
结果如下。
和之前的图片格式转换有点类似,就是对图像进行处理。
以前大家可能会使用到美图秀秀,现在可能就是抖音的滤镜了。
其实使用Python的OpenCV,就能够快速实现很多你想要的效果。
# 图像转换

import cv2

# 读取图片

img = cv2.imread("img.jpg")

# 灰度

grey = cv2.cvtColor(img, cv2.COLOR_BGR2GRAY)

invert = cv2.bitwise_not(grey)

# 高斯滤波

blur_img = cv2.GaussianBlur(invert, (7, 7), 0)

inverse_blur = cv2.bitwise_not(blur_img)

sketch_img = cv2.divide(grey, inverse_blur, scale=256.0)

# 保存

cv2.imwrite('sketch.jpg', sketch_img)

cv2.waitKey(0)

cv2.destroyAllWindows()有了这个Python脚本,你将不需要任何软件来了解CPU的温度。
# 获取CPU温度

from time import sleep

from pyspectator.processor import Cpu

cpu = Cpu(monitoring_latency=1)

with cpu:

while True:

print(f'Temp: {cpu.temperature} °C')

sleep(2)有的时候,我们需要从PDF中提取表格数据。
一时间你可能会先想到手工整理,但是当工作量特别大,手工可能就比较费劲。
然后你可能会想到一些软件和网络工具来提取 PDF 表格。
下面这个简单的脚本将帮助你在一秒钟内完成相同的操作。
# 方法①
import camelot
tables = camelot.read_pdf("tables.pdf")
print(tables)
tables.export("extracted.csv", f="csv", compress=True)
# 方法②, 需要安装Java8
import tabula
tabula.read_pdf("tables.pdf", pages="all")
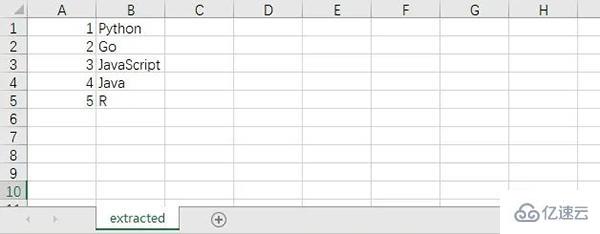
tabula.convert_into("table.pdf", "output.csv", output_format="csv", pages="all")PDF文档的内容如下,包含了一个表格。
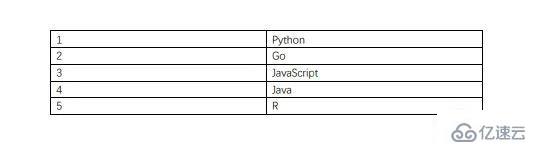
提取到的CSV文件内容如下。
该脚本将简单地截取屏幕截图,而无需使用任何屏幕截图软件。
在下面的代码中,给大家展示了两种Python截取屏幕截图的方法。
# 方法①

from mss import mss

with mss() as screenshot:

screenshot.shot(output='scr.png')

# 方法②

import PIL.ImageGrab

scr = PIL.ImageGrab.grab()

scr.save("scr.png")这个Python脚本可以进行拼写检查,当然只对英文有效,毕竟中文博大精深呐。
# 拼写检查

# 方法①

import textblob

text = "mussage"

print("original text: " + str(text))

checked = textblob.TextBlob(text)

print("corrected text: " + str(checked.correct()))

# 方法②

import autocorrect

spell = autocorrect.Speller(lang='en')

# 以英语为例

print(spell('cmputr'))

print(spell('watr'))

print(spell('survice'))