用一个 for 循环,把数据一条一条地插入;生成一条插入 sql,类似这种 insert into user(name,pwd) values('aa','123'),('cc','123')...
该方案的优势在于,JDBC 中的 PreparedStatement 有预编译功能,预编译之后会缓存起来。之后SQL执行会比较快,且 JDBC可以开启批处理,这个批处理执行非常给力。
劣势在于,很多时候我们的 SQL 服务器和应用服务器可能并不是同一台,所以必须要考虑网络 IO。如果网络 IO 比较费时间的话,那么可能会拖慢 SQL 执行的速度。
该方案的优势在于,只有一次网络 IO。即使分片处理也只是数次网络 IO,所以这种方案不会在网络 IO 上花费太多时间。
当然这种方案也有劣势。一是 SQL 太长了,甚至可能需要分片后批量处理;二是无法充分发挥 PreparedStatement 预编译的优势,SQL 要重新解析且无法复用;三是最终生成的 SQL 太长了,数据库管理器解析这么长的 SQL 也需要时间。
我们接下来会采用第二种方案进行实现。
如果我们想要拉高插入效率,肯定不能够一条一条地插入了,必须得使用foreach批量插入;
采用多线程进行异步插入,提升性能;
我们不可能单次提交多个insert,大量的插入操作会很耗时,短时间内完不成,可以采用定时任务来实现。
接下来我们就来说说具体该怎么利用代码进行实现。
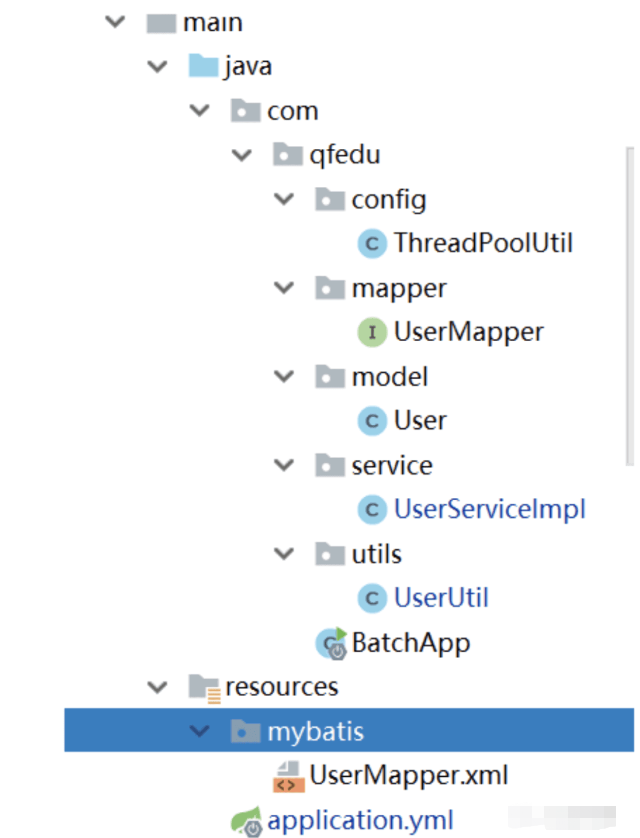
本案例主要是基于SpringBoot整合mybatis进行实现。
    <parent>

        <groupId>org.springframework.boot</groupId>

        <artifactId>spring-boot-starter-parent</artifactId>

        <version>2.3.4.RELEASE</version>

    </parent>

    <dependencies>

        <dependency>

            <groupId>org.springframework.boot</groupId>

            <artifactId>spring-boot-starter-web</artifactId>

        </dependency>

        <dependency>

            <groupId>mysql</groupId>

            <artifactId>mysql-connector-java</artifactId>

            <version>5.1.48</version>

        </dependency>

        <dependency>

            <groupId>org.mybatis.spring.boot</groupId>

            <artifactId>mybatis-spring-boot-starter</artifactId>

            <version>2.1.0</version>

        </dependency>

        <dependency>

            <groupId>org.projectlombok</groupId>

            <artifactId>lombok</artifactId>

        </dependency>

        <dependency>

            <groupId>org.springframework.boot</groupId>

            <artifactId>spring-boot-starter-test</artifactId>

        </dependency>

    </dependencies>
@SpringBootApplication  //引导类核心注解

@EnableScheduling //开启定时任务

public class BatchApplication {

    public static void main(String[] args) {

        SpringApplication.run(BatchApplication.class,args);

    }

}server: port: 9999 # 指定端口号 spring: datasource: driver-class-name: com.mysql.cj.jdbc.Driver url: jdbc:mysql://localhost:3306/springboot?useUnicode=true&characterEncoding=utf-8&useSSL=false&serverTimezone=UTC username: root password: 123 mybatis: mapper-locations: classpath:mybatis/*.xml #指定mapper映射文件路径 type-aliases-package: com.qfedu.model # 别名
创建表:
CREATE TABLE `user` (

  `id` INT(11) NOT NULL AUTO_INCREMENT,

  `username` VARCHAR(30) DEFAULT NULL,

  `pwd` VARCHAR(20) DEFAULT NULL,

  `sex` INT(11) DEFAULT NULL,

  `birthday` DATETIME DEFAULT NULL,

  PRIMARY KEY (`id`)

) ENGINE=MyISAM  DEFAULT CHARSET=utf8
注意:MyISAM效率会比INNODB快。
User.java
@Data

public class User {

    private int id;

    private String username;

    private String pwd;

    private int sex;

    private LocalDate birthday;

}UserMapper.java
@Mapper

public interface UserMapper {

    void insertBatch(@Param("userList") List<User> userList);

}
UserMapper.xml
<?xml version="1.0" encoding="UTF-8" ?>

<!DOCTYPE mapper

        PUBLIC "-//mybatis.org//DTD Mapper 3.0//EN"

        "http://mybatis.org/dtd/mybatis-3-mapper.dtd">

<mapper namespace="com.qfedu.mapper.UserMapper">

    <insert id="addList" parameterType="User"  >

        insert  into user (username,pwd,sex,birthday) values

        <foreach collection="list" item="item" separator=",">

            (#{item.username}, #{item.pwd}, #{item.sex}, #{item.birthday})

        </foreach>

    </insert>

</mapper>SpringBoot默认整合了scheduled,使用步骤如下:
在引导类加入@EnableScheduling注解,开启定时任务;
在业务层方法上加入 @Scheduled注解,定义cron表达式周期执行。
业务层方法中开启的线程可以根据当前机器的配置来修改。我们这里开了7个线程,每个线程去执行20次循环,一次添加5000条数据。这里要注意mybatis批量插入时,不建议超过10000条错误。因为数据量过大,容易出现栈内存溢出的问题。
@Component
public class UserServiceImpl {
@Autowired
private UserMapper userMapper;
@Autowired
//线程池
private ThreadPoolExecutor executor;
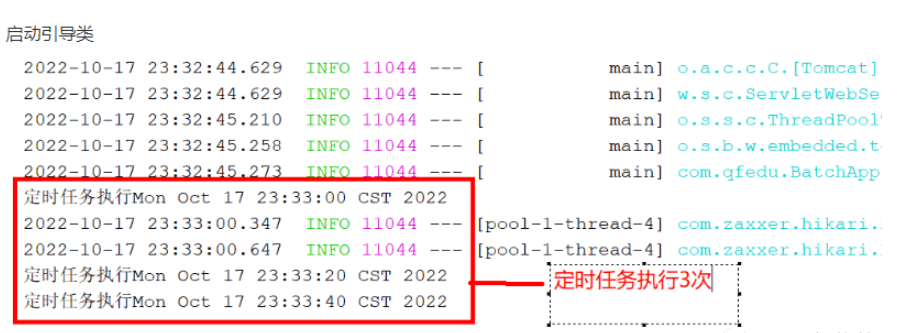
@Scheduled(cron = "0/20 * * * * ?") //每隔20秒执行一次
public void addList(){
System.out.println("定时器被触发");
long start = System.currentTimeMillis();
for (int i = 0; i < 7; i++) {
Thread thread = new Thread(() -> {
try {
for (int j = 0; j < 20; j++) {
userMapper.addList(UserUtil.getUsers(5000));
}
} catch (Exception e) {
e.printStackTrace();
}
});
try {
executor.execute(thread);
} catch (Exception e) {
System.out.println(e.getMessage());
}
}
}
}我们用来模拟生成要插入的数据,实际业务开发的时候可以是从excel中导入的数据。
public class UserUtil {

    private static Random random = new Random();

    public static List<User> getUsers(int num){

        List<User> users = new ArrayList<>();

        for (int i = 0;i<num;i++){

            User user = new User();

            user.setBirthday(LocalDate.now());

            user.setSex(random.nextInt(2));

            user.setPwd("123"+random.nextInt(100000));

            user.setUsername("batch"+random.nextInt(num));

            users.add(user);

        }

        return users;

    }

}线程池参数:
corePoolSize 核心线程数,在线程池中要保证的最小线程数;
mainumPoolSize 最大线程数,线程池中能运行的最大线程数;
keepAliveTime 保证存活时间,当线程空闲时间,多久会回收线程;
unit 和keepAliveTime配合使用,时间单位;
workQueue 工作队列,用于存储任务在任务被执行之前。
@Configuration

public class ThreadPoolExecutorConfig {

    @Bean

    public ThreadPoolExecutor threadPoolExecutor() {

        //线程池中6个线程,最大8个线程,用于缓存任务的阻塞队列数5个

        ThreadPoolExecutor executor = new ThreadPoolExecutor(6, 8, 5, TimeUnit.SECONDS, new ArrayBlockingQueue<>(100));

        executor.allowCoreThreadTimeOut(true);//允许超时

        return executor;

    }

}