一、nginx的请求限制
1. http协议的连接与请求
http协议版本与连接关系
| http协议版本 | 连接关系 |
|---|---|
| http1.0 | tcp不能复用 |
| http1.1 | 顺序性tcp复用 |
| http2.0 | 多路复用tcp复用 |
http请求建立在一次tcp连接的基础上。
一次tcp连接至少可以产生一次http请求,http1.1版本以后,建立一次tcp连接可以发送多次http请求。

1. 连接频率限制
语法
syntax:    limit_conn_zone key zone=name:size;

default:  —

context:  http


syntax:    limit_conn zone number;

default:  —

context:  http, server, location
用法
在nginx配置文件中的 http 下配置
http {

  # ...其它代码省略...

  # 开辟一个10m的连接空间,命名为addr

  limit_conn_zone $binary_remote_addr zone=addr:10m;

  server {

    ...

    location /download/ {

      # 服务器每次只允许一个ip地址连接

      limit_conn addr 1;

    }

  }

}
2. 请求频率限制
语法
syntax:    limit_req_zone key zone=name:size rate=rate;

default:  —

context:  http


syntax:    limit_req zone=name [burst=number] [nodelay];

default:  —

context:  http, server, location
用法
在nginx配置文件中的 http 下配置
http {


  # ...其它代码省略...


  # 开辟一个10m的请求空间,命名为one。同一个ip发送的请求,平均每秒只处理一次

  limit_req_zone $binary_remote_addr zone=one:10m rate=1r/s;


  server {

      ...


    location /search/ {

      limit_req zone=one;

      # 当客户端请求超过指定次数,最多宽限5次请求,并延迟处理,1秒1个请求

      # limit_req zone=one burst=5;

      # 当客户端请求超过指定次数,最多宽限5次请求,并立即处理。

      # limit_req zone=one burst=5 nodelay;


    }

  }

}
二、nginx的访问控制
1. 基于ip的访问控制
语法
syntax:    allow address | cidr | unix: | all;

default:  —

context:  http, server, location, limit_except


syntax:    deny address | cidr | unix: | all;

default:  —

context:  http, server, location, limit_except
address:ip地址,例如:192.168.1.1cidr:例如:192.168.1.0/24;unix:socket方式all:所有
用法
在nginx配置文件中的 server 下配置
server {
# ...其它代码省略...
location ~ ^/index_1.html {
root /usr/share/nginx/html;
deny 151.19.57.60; # 拒绝这个ip访问
allow all; # 允许其他所有ip访问
}
location ~ ^/index_2.html {
root /usr/share/nginx/html;
allow 151.19.57.0/24; # 允许ip 151.19.57.* 访问
deny all; # 拒绝其他所有ip访问
}
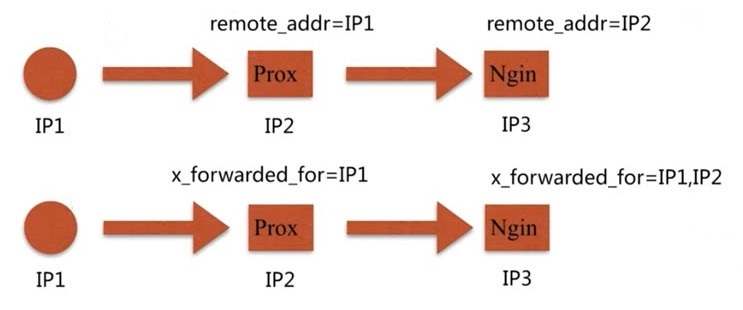
}ngx_http_access_module 的局限性
当客户端通过代理访问时,nginx的remote_addr获取的是代理的ip
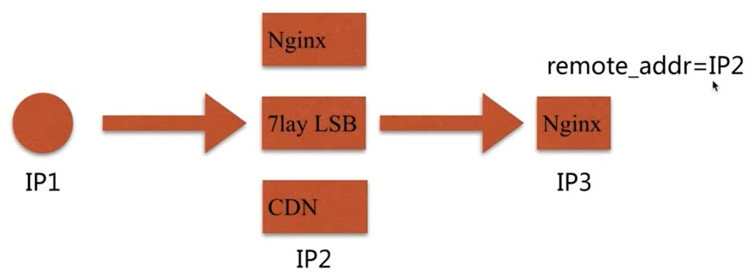
http_x_forwarded_for
http_x_forwarded_for = client ip, proxy1 ip, proxy2 ip, ...
remote_addr 获取的是直接和服务端建立连接的客户端ip。http_x_forwarded_for 可以记录客户端及所有中间代理的ip
2. 基于用户的登录认证
语法
syntax:    auth_basic string | off;

default:  auth_basic off;

context:  http, server, location, limit_except


syntax:    auth_basic_user_file file;

default:  —

context:  http, server, location, limit_except
用法
要使用 htpasswd 命令,需要先安装httpd-tools
[root~]# yum -y install httpd-tools
使用 htpasswd 命令创建账号密码文件
[root/etc/nginx]# htpasswd -c ./auth_conf auth_root

new password:

re-type new password:

adding password for user auth_root


[root/etc/nginx]# ll auth_conf

-rw-r--r-- 1 root root 48 7月  9 11:38 auth_conf


[root/etc/nginx]# cat auth_conf

auth_root:$apr1$2v6gftlm$oo2le8glgqwi68mcqtcn90
在nginx配置文件中的 server 下配置
server {

  # ...其它代码省略...


  location ~ ^/index.html {

    root  /usr/share/nginx/html;

    auth_basic "auth access! input your password!";

    auth_basic_user_file /etc/nginx/auth_conf;

  }

}修改后重新载入配置文件nginx -s reload
使用浏览器访问 http://192.168.33.88/index.html
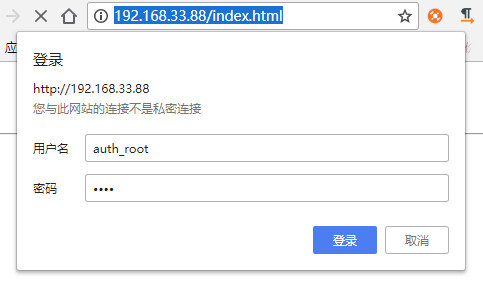
输入正确的用户名和密码,即可正常访问。
ngx_http_auth_basic_module 的局限性
用户信息依赖文件方式
操作管理效率低下