在本系列的第一篇文章中,我们研究了样板如何通过提供构建项目的基础来改进您的开发工作。
理想情况下,样板文件应该提供足够的框架来开始使用,同时让您专注于需要编写的特定业务逻辑、核心需求或特定于域的代码。
具体来说,我们查看了 WordPress Widget 样板和 WordPress 插件样板。在这篇文章中,我们将利用插件样板来编写我们自己的插件,以了解样板如何为编写良好的代码奠定基础,以及我们如何将其用作我们未来工作的起点。
在这篇文章中,我们将构建一个帖子通知小部件,允许作者在其页面上的内容之前添加新的帖子消息。这实际上将基于一个已经存在的插件,因此项目完成后您可以有一个参考点。
与我的教程的其余部分一样,我喜欢提前计划项目,所以让我们列出我们要做的所有事情:
总的来说,这是一个相对简单的插件,但它应该提供一个可靠的示例,说明 Boilerplates 如何让您在 WordPress 最佳实践的背景下始终专注于您的特定功能。
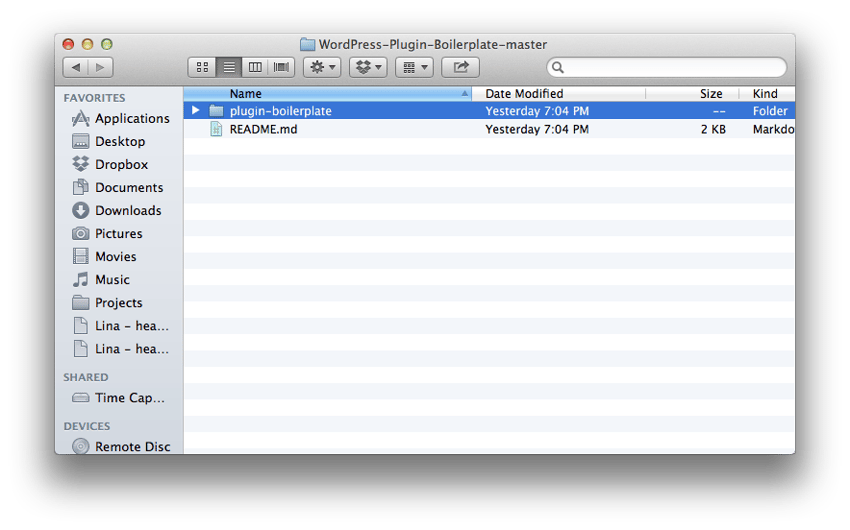
为了开始使用,您需要下载 WordPress 插件样板的副本。您可以通过导航到其 GitHub 页面,然后单击页面顶部附近的“zip”按钮或单击此处来完成此操作。
接下来,将下载的内容解压到您的plugins 目录中。它最初应该写出一个名为 plugin-boilerplate 的目录。
接下来,在您最喜欢的 IDE 中打开post-message 目录。我们要做的第一件事是打开 plugin.php,然后找到代码中存在的所有 TODO。
开箱即用的代码将如下所示:
<?php
/*
Plugin Name: TODO
Plugin URI: TODO
Description: TODO
Version: 1.0
Author: TODO
Author URI: TODO
Author Email: TODO
License:

  Copyright 2013 TODO (email@domain.com)

  This program is free software; you can redistribute it and/or modify
  it under the terms of the GNU General Public License, version 2, as
  published by the Free Software Foundation.

  This program is distributed in the hope that it will be useful,
  but WITHOUT ANY WARRANTY; without even the implied warranty of
  MERCHANTABILITY or FITNESS FOR A PARTICULAR PURPOSE.  See the
  GNU General Public License for more details.

  You should have received a copy of the GNU General Public License
  along with this program; if not, write to the Free Software
  Foundation, Inc., 51 Franklin St, Fifth Floor, Boston, MA  02110-1301  USA

*/

// TODO: rename this class to a proper name for your plugin
class PluginName {

	/*--------------------------------------------*
	 * Constructor
	 *--------------------------------------------*/

	/**
	 * Initializes the plugin by setting localization, filters, and administration functions.
	 */
	function __construct() {

		// Load plugin text domain
		add_action( 'init', array( $this, 'plugin_textdomain' ) );

		// Register admin styles and scripts
		add_action( 'admin_print_styles', array( $this, 'register_admin_styles' ) );
		add_action( 'admin_enqueue_scripts', array( $this, 'register_admin_scripts' ) );

		// Register site styles and scripts
		add_action( 'wp_enqueue_scripts', array( $this, 'register_plugin_styles' ) );
		add_action( 'wp_enqueue_scripts', array( $this, 'register_plugin_scripts' ) );

		// Register hooks that are fired when the plugin is activated, deactivated, and uninstalled, respectively.
		register_activation_hook( __FILE__, array( $this, 'activate' ) );
		register_deactivation_hook( __FILE__, array( $this, 'deactivate' ) );
		register_uninstall_hook( __FILE__, array( $this, 'uninstall' ) );

	    /*
	     * TODO:
	     * Define the custom functionality for your plugin. The first parameter of the
	     * add_action/add_filter calls are the hooks into which your code should fire.
	     *
	     * The second parameter is the function name located within this class. See the stubs
	     * later in the file.
	     *
	     * For more information:
	     * http://codex.wordpress.org/Plugin_API#Hooks.2C_Actions_and_Filters
	     */
	    add_action( 'TODO', array( $this, 'action_method_name' ) );
	    add_filter( 'TODO', array( $this, 'filter_method_name' ) );

	} // end constructor

	/**
	 * Fired when the plugin is activated.
	 *
	 * @param	boolean	$network_wide	True if WPMU superadmin uses "Network Activate" action, false if WPMU is disabled or plugin is activated on an individual blog
	 */
	public function activate( $network_wide ) {
		// TODO:	Define activation functionality here
	} // end activate

	/**
	 * Fired when the plugin is deactivated.
	 *
	 * @param	boolean	$network_wide	True if WPMU superadmin uses "Network Activate" action, false if WPMU is disabled or plugin is activated on an individual blog
	 */
	public function deactivate( $network_wide ) {
		// TODO:	Define deactivation functionality here
	} // end deactivate

	/**
	 * Fired when the plugin is uninstalled.
	 *
	 * @param	boolean	$network_wide	True if WPMU superadmin uses "Network Activate" action, false if WPMU is disabled or plugin is activated on an individual blog
	 */
	public function uninstall( $network_wide ) {
		// TODO:	Define uninstall functionality here
	} // end uninstall

	/**
	 * Loads the plugin text domain for translation
	 */
	public function plugin_textdomain() {

		// TODO: replace "plugin-name-locale" with a unique value for your plugin
		load_plugin_textdomain( 'plugin-name-locale', false, dirname( plugin_basename( __FILE__ ) ) . '/lang' );

	} // end plugin_textdomain

	/**
	 * Registers and enqueues admin-specific styles.
	 */
	public function register_admin_styles() {

		// TODO:	Change 'plugin-name' to the name of your plugin
		wp_enqueue_style( 'plugin-name-admin-styles', plugins_url( 'plugin-name/css/admin.css' ) );

	} // end register_admin_styles

	/**
	 * Registers and enqueues admin-specific JavaScript.
	 */
	public function register_admin_scripts() {

		// TODO:	Change 'plugin-name' to the name of your plugin
		wp_enqueue_script( 'plugin-name-admin-script', plugins_url( 'plugin-name/js/admin.js' ) );

	} // end register_admin_scripts

	/**
	 * Registers and enqueues plugin-specific styles.
	 */
	public function register_plugin_styles() {

		// TODO:	Change 'plugin-name' to the name of your plugin
		wp_enqueue_style( 'plugin-name-plugin-styles', plugins_url( 'plugin-name/css/display.css' ) );

	} // end register_plugin_styles

	/**
	 * Registers and enqueues plugin-specific scripts.
	 */
	public function register_plugin_scripts() {

		// TODO:	Change 'plugin-name' to the name of your plugin
		wp_enqueue_script( 'plugin-name-plugin-script', plugins_url( 'plugin-name/js/display.js' ) );

	} // end register_plugin_scripts

	/*--------------------------------------------*
	 * Core Functions
	 *---------------------------------------------*/

	/**
 	 * NOTE:  Actions are points in the execution of a page or process
	 *        lifecycle that WordPress fires.
	 *
	 *		  WordPress Actions: http://codex.wordpress.org/Plugin_API#Actions
	 *		  Action Reference:  http://codex.wordpress.org/Plugin_API/Action_Reference
	 *
	 */
	function action_method_name() {
    	// TODO:	Define your action method here
	} // end action_method_name

	/**
	 * NOTE:  Filters are points of execution in which WordPress modifies data
	 *        before saving it or sending it to the browser.
	 *
	 *		  WordPress Filters: http://codex.wordpress.org/Plugin_API#Filters
	 *		  Filter Reference:  http://codex.wordpress.org/Plugin_API/Filter_Reference
	 *
	 */
	function filter_method_name() {
	    // TODO:	Define your filter method here
	} // end filter_method_name

} // end class

// TODO:	Update the instantiation call of your plugin to the name given at the class definition
$plugin_name = new PluginName();
接下来,我们需要使每个 TODO 插件特定,以便我们将所有实例放置在需要的地方,并使用插件名称的变体。
例如:
Post_Message
post-message
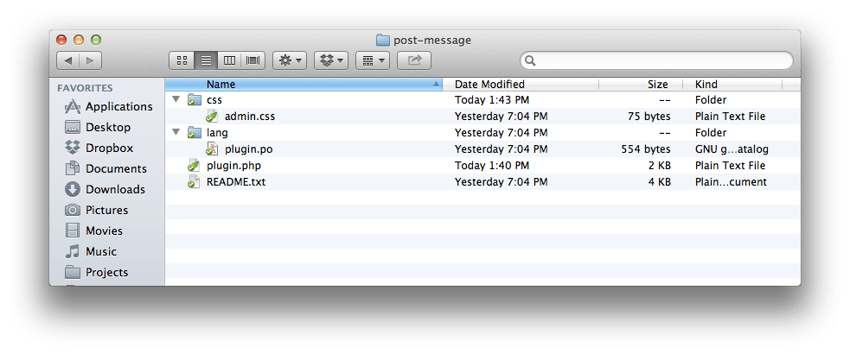
接下来,我们还可以删除除 admin.css 样式之外的所有 JavaScript 和样式表调用。稍后我们将使用该文件。另请务必从样板中删除以下文件:
这将为您留下以下目录结构:
请注意,这是关于样板的一件事:如果有的话,您应该想从中删除一些东西。如果您必须添加一些可以帮助您起步的东西 - 或者更基础的东西 - 那么这可能是一个改进它的机会。
无论如何,虽然我们还没有完成,而且我们将会添加到插件中,但此时文件应该如下所示:
<?php
/*
Plugin Name: Tom McFarlin
Plugin URI: http://tommcfarlin.com/single-post-message/
Description: A simple way to add a message at the top of each of your posts.
Version: 1.0
Author: Tom McFarlin
Author URI: http://tommcfarlin.com/
Author Email: tom@tommcfarlin.com
License:

  Copyright 2013 Tom McFarlin (om@tommcfarlin.com)

  This program is free software; you can redistribute it and/or modify
  it under the terms of the GNU General Public License, version 2, as
  published by the Free Software Foundation.

  This program is distributed in the hope that it will be useful,
  but WITHOUT ANY WARRANTY; without even the implied warranty of
  MERCHANTABILITY or FITNESS FOR A PARTICULAR PURPOSE.  See the
  GNU General Public License for more details.

  You should have received a copy of the GNU General Public License
  along with this program; if not, write to the Free Software
  Foundation, Inc., 51 Franklin St, Fifth Floor, Boston, MA  02110-1301  USA

*/

class Post_Message {

	/*--------------------------------------------*
	 * Constructor
	 *--------------------------------------------*/

	/**
	 * Initializes the plugin by setting localization, filters, and administration functions.
	 */
	function __construct() {

		// Load plugin text domain
		add_action( 'init', array( $this, 'plugin_textdomain' ) );

		// Register admin styles and scripts
		add_action( 'admin_print_styles', array( $this, 'register_admin_styles' ) );

	} // end constructor

	/**
	 * Loads the plugin text domain for translation
	 */
	public function plugin_textdomain() {
		load_plugin_textdomain( 'post-message', false, dirname( plugin_basename( __FILE__ ) ) . '/lang' );
	} // end plugin_textdomain

	/**
	 * Registers and enqueues admin-specific styles.
	 */
	public function register_admin_styles() {
		wp_enqueue_style( 'post-message-admin', plugins_url( 'post-message/css/admin.css' ) );
	} // end register_admin_styles

} // end class

new Post_Message();
接下来,我们需要真正开始研究我们的核心业务逻辑。
首先,我们需要准确地确定它是如何工作的:
因此,我们需要做的第一件事是引入一个钩子和一个函数,以便捕获帖子元框中的数据。在构造函数中,我们添加以下行:
add_action( 'add_meta_boxes', array( $this, 'add_notice_metabox' ) );
接下来,我们需要定义函数 add_notice_metabox 以便我们可以实际渲染元框,所以现在让我们提供该函数:
function add_notice_metabox() {

	add_meta_box(
		'post_message',
		__( 'Post Message', 'post-message' ),
		array( $this, 'post_message_display' ),
		'post',
		'normal',
		'high'
	);

} // end add_notice_metabox
之后,我们需要编写一个函数来负责实际渲染帖子内容:
function post_message_display( $post ) {

	wp_nonce_field( plugin_basename( __FILE__ ), 'post_message_nonce' );

	// The textfield and preview area
	echo '<textarea id="post-message" name="post_message" placeholder="' . __( 'Enter your post message here. HTML accepted.', 'post-message' ) . '">' . esc_textarea( get_post_meta( $post->ID, 'post_message', true ) ) . '</textarea>';

} // end post_message_display
在上面,请注意,出于安全目的,我们引入了一个随机数字段。另请注意,我们已为 textarea 指定了 post-message 的 ID,以便我们可以轻松地使用 CSS 对其进行样式设置,并且我们已将其命名为 post_message ,这在我们保存内容时会派上用场textarea 到特定帖子的元数据。
最后,我们利用 esc_textarea 函数来确保我们正确编码数据以将其呈现在文本区域中。
此时,让我们使用 admin.css 文件添加一些简单的样式,以使帖子消息的外观和感觉与内容略有不同:
#post-message { width: 100%; }
这应该会产生如下所示的结果:

当然,我们还没有完成。当用户单击“发布”或“更新”按钮时,我们需要实际保存和检索数据。为此,我们需要设置回调来保存发布数据。
所以我们需要做的最后一件事是引入一个 save_notice 函数。首先,我们将使用以下代码在构造函数中注册它:
add_action( 'save_post', array( $this, 'save_notice' ) );
然后,我们将定义以下函数:
function save_notice( $post_id ) {

	if ( isset( $_POST['post_message_nonce'] ) && isset( $_POST['post_type'] ) ) {

		// Don't save if the user hasn't submitted the changes
		if ( defined( 'DOING_AUTOSAVE' ) && DOING_AUTOSAVE ) {
			return;
		} // end if

		// Verify that the input is coming from the proper form
		if ( ! wp_verify_nonce( $_POST['post_message_nonce'], plugin_basename( __FILE__ ) ) ) {
			return;
		} // end if

		// Make sure the user has permissions to post
		if ( 'post' == $_POST['post_type'] ) {
			if ( ! current_user_can( 'edit_post', $post_id ) ) {
				return;
			} // end if
		} // end if/else

		// Read the post message
		$post_message = isset( $_POST['post_message'] ) ? $_POST['post_message'] : '';

		// If the value for the post message exists, delete it first. Don't want to write extra rows into the table.
		if ( 0 == count( get_post_meta( $post_id, 'post_message' ) ) ) {
			delete_post_meta( $post_id, 'post_message' );
		} // end if

		// Update it for this post.
		update_post_meta( $post_id, 'post_message', $post_message );

	} // end if

} // end save_notice
我们在之前的文章中详细讨论了保存帖子元数据的内容,因此我不想在这里赘述,只需说明该函数执行以下操作即可:
此时,我们已经准备好测试插件了,所以填写 textarea,保存数据,当页面刷新时,确保数据也显示在 textarea 中。
如果是这样,我们就可以继续前进;否则,请确保您的代码与上面的代码类似。
接下来,我们准备在内容中呈现帖子消息。执行此操作的过程如下:
the_content 过滤器注册函数所以让我们这样做吧。首先,我们用 the_content 过滤器注册一个函数:
add_filter( 'the_content', array( $this, 'prepend_post_message' ) );
之后,让我们设置实际的功能:
function prepend_post_message( $content ) {

	// If there is a notice, prepend it to the content
	if ( '' != get_post_meta( get_the_ID(), 'post_message', true ) ) {

		$post_message = '<p class="post-message">';
		$post_message .= get_post_meta( get_the_ID(), 'post_message', true );
		$post_message .= '</p><!-- /.post-message -->';

		$content = $post_message . $content;

	} // end if

	return $content;

} // end prepend_post_message
请注意,发布消息包含在其自己的 p 元素中,并具有自己的类名称,以便您可以根据需要轻松设置其样式(如果您愿意的话)。
此时,我们应该拥有查看帖子消息所需的一切,所以让我们测试一下。创建帖子消息,发布它,然后在浏览器中查看该帖子。
接下来,删除帖子内容,然后验证没有出现任何内容。
很简单,不是吗?
最后,我们需要确保清理自述文件并正确本地化插件。
首先,自述文件应包含常用信息。这在很大程度上是主观的;不过,我在下面提供了一个示例自述文件:
=== Post Message ===
Contributors: tommcfarlin
Donate link: http://tommcfarlin.com/single-post-message/
Tags: post
Requires at least: 3.4.1
Tested up to: 3.5
Stable tag: 1.0
License: GPLv2 or later
License URI: http://www.gnu.org/licenses/gpl-2.0.html

Easily add short messages and announcements above posts. Displays in the RSS feed and on the blog.

== Description ==

Post Message is a plugin that allows you to add custom messages, announcements, and notices to individual posts. It's styled to grab the reader's attention and will render in both the browser *and* in RSS readers.

Post Message...

* Supports the use of HTML tags in the message content
* Is available directly under the post content editor
* Is fully localized and ready for translation

== Installation ==

= Using The WordPress Dashboard =

1. Navigate to the 'Add New' Plugin Dashboard
1. Select `post-message.zip` from your computer
1. Upload
1. Activate the plugin on the WordPress Plugin Dashboard

= Using FTP =

1. Extract `post-message.zip` to your computer
1. Upload the `post-messsage` directory to your `wp-content/plugins` directory
1. Activate the plugin on the WordPress Plugins dashboard

== Changelog ==

= 1.0 =
* Initial release
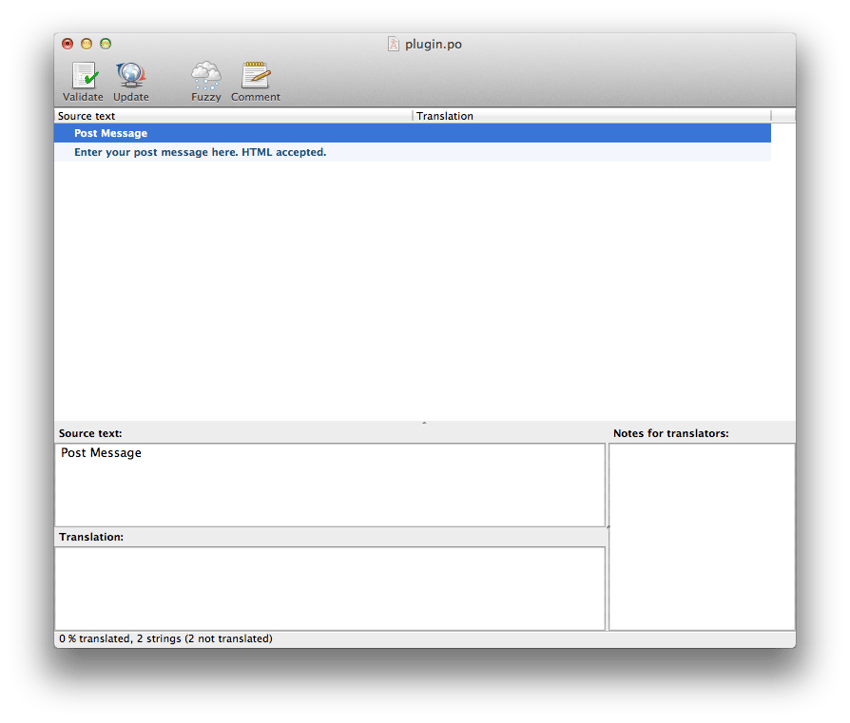
最后,本地化应该轻而易举:只需打开 IDE 中 `lang` 目录中的 `plugin.po` 文件,确保更改填写插件名称和作者信息,然后在 POEdit 中打开以注册本地化文件。
保存您的工作,然后就可以开始了!
在本系列中,我们准确地研究了利用 WordPress Boilerplates 需要什么,它们如何帮助影响我们的工作流程,并帮助我们更多地关注项目的核心,而不是重新发明轮子并获得通过重复许多已经需要的事情来开始工作。
此外,我们还构建了一个插件,可以下载以供进一步审查。
希望本系列能够提供一个案例,说明为什么您应该在适用时使用样板代码,并帮助展示它们如何减轻在每个项目中重写大量相同代码的痛苦。